AI Photo Colorization — How to Bring Old Black-and-White Photos to Life
Family archives are full of photographs that deserve more than a drawer. A 1950s wedding, a grandfather's first car, a school portrait from the 70s — these are stories frozen in gray. Modern AI photo colorization can restore them to color in seconds, with results that used to take a trained restoration artist hours to produce. This article explains why colorizing old photos matters, how modern AI actually does it, and how to get the best results when you try it yourself with Colourise.
Why Colorize Old Photos
Grayscale isn't wrong — many photographs were made in black-and-white for artistic reasons and are better left alone. But an enormous number of personal and historical photos were made in B&W simply because color film wasn't available, affordable, or practical at the time. When those images are viewed today, a few things happen:
- The people in them feel distant. Skin tones, eye colors, and clothing colors are what make a face feel present. Without them, relatives we never met blend into history instead of becoming part of our living memory.
- Displays amplify the mismatch. A B&W print looked appropriate under a tungsten lamp in 1960. On a high-brightness OLED phone screen in 2026, the same image can feel flattened and dated.
- Restoration unlocks stories. A colorized uniform can reveal a regiment. A colorized dress can date a decade. Color carries context that grayscale hides.
- Creative projects benefit. Family slideshows, anniversary gifts, genealogy pages, and social-media throwbacks all land harder with colorized originals.
None of this replaces the original — good colorization workflows always keep the source file untouched. It's an addition, not a substitution.
How AI Colorization Works
Before deep learning, colorization was a painstaking manual process: an artist would mask each region (skin, sky, grass, fabric), pick a plausible color, and blend carefully to avoid a "painted-on" look. A single portrait could take several hours.
Modern AI does it differently. A colorization model is trained on millions of color photographs that have been converted to grayscale and back. The model learns the probabilistic relationship between scene content and color — "skin here tends to be this range of tones," "this texture is grass, which is usually green with yellow or brown mixed in," "this pattern is a 1940s men's suit, usually dark gray or navy." When you hand it a new B&W photo, it isn't guessing randomly — it's pattern-matching against an enormous catalog of plausible colorings.
Three things make or break quality:
- Semantic segmentation. The model must correctly identify faces, skin, hair, clothing, sky, foliage, and man-made objects. Mistaking a brown horse for a gray rock produces obviously wrong colors.
- Probabilistic color assignment. For each region, the model proposes a range of believable colors. A good model converges on natural choices; a weak model drifts toward over-saturated or desaturated results.
- Detail preservation. The original grain, sharpness, and contrast should survive the process. Cheap colorization smears detail under painterly washes; high-quality colorization leaves the photo looking like it was shot in color from day one.
What Colourise Does Differently
Most free online colorizers run a single model with a single output. Colourise takes a few extra steps designed specifically for archival and family photos:
- Era-aware tone mapping. The palette you expect for a 1910 photo is different from a 1950 photo is different from a 1985 photo. Colourise biases its output toward colors that were actually common for the era detected in the image (paper tone, grain size, and subject cues help infer the decade).
- Grain and detail preservation. The colorization pass is applied on top of the original luminance channel, not replacing it. Film grain, soft focus, and subtle contrast transitions come through intact — the result feels like the photo was shot in color, not painted in color later.
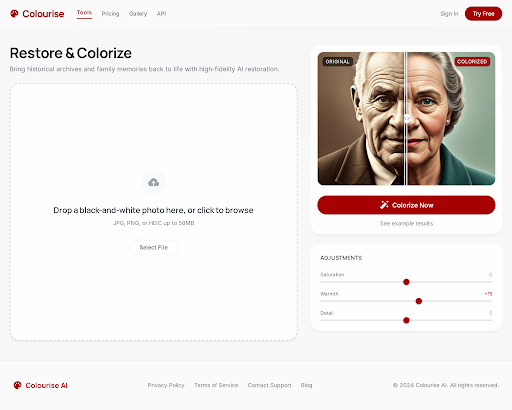
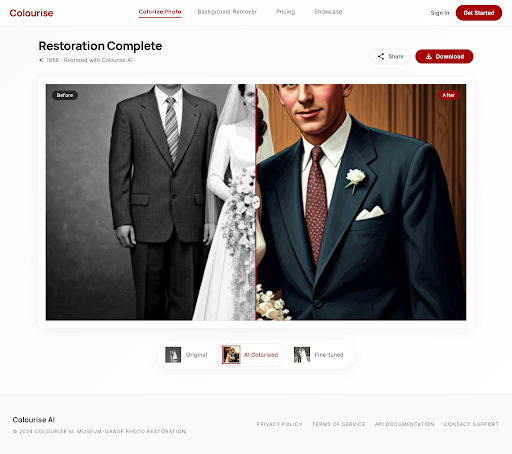
- Side-by-side comparison. Every colorized result is shown with a before/after slider so you can verify nothing important shifted.
- Fine-tuning without starting over. Three sliders — Saturation, Warmth, Detail — let you nudge the result without re-running the whole model. No full re-renders, no lost progress.
How to Colorize a Photo with Colourise
The full workflow, end-to-end:
- Scan or photograph your original at high resolution. 300 dpi or higher for prints; for negatives or slides, use a dedicated scanner if possible. The AI has more to work with when it sees real grain instead of compression artifacts.
- Upload to Colourise. Drag and drop, or click to browse. The file stays on a secure HTTPS connection and is removed from processing servers after your session ends.
- Let the AI make the first pass. Usually a few seconds for a typical print-size image. You'll see the colorized result next to the original automatically.
- Fine-tune if needed. Nudge Saturation, Warmth, or Detail to taste. For 1900s–1940s photos, muted tones usually feel most authentic; for 70s–80s, slightly punchier settings match the era.
- Download. Colourise outputs a high-resolution color file. Keep the original scan as well — always.
Tips for Best Results
A few small habits make a big difference:
- Clean the print before you scan. A soft brush and canned air beat any amount of post-processing. Less dust and fewer scratches mean the AI can focus on color, not artifacts.
- Trust the default first. The auto-colorization is tuned to produce natural results. Resist the urge to push saturation on the first look — give your eyes a minute to adjust.
- Zoom in to check faces. Skin tones are where the eye is most critical. If faces look right, the rest of the image almost always looks right too.
- Match the era for wardrobe. If you know the decade of a photo, skew color choices toward what was common then — muted earth tones for pre-war photos, brighter synthetics for the 60s and 70s.
- Keep the original file. Colorization should always be non-destructive. Your original scan is the archive; the colorized version is the display copy.
Frequently Asked Questions
Will the colors be historically accurate?
The AI produces plausible colors, not certified-historical ones. For a specific uniform, vehicle, or dress you want to match to a known record, use the sliders to adjust tones after the first pass — or colorize, download, and hand-correct specific regions in your image editor of choice.
Is my photo private?
Uploads run over HTTPS and are processed in an isolated session. Files are removed from processing servers after your session ends. We don't train on your uploads.
Can I colorize a damaged or faded photo?
Yes, but with limits. If the original is very faded or torn, consider running a restoration pass first (dust/scratch removal, contrast rebuilding) before colorization. Colourise's Photo Enhancement tools can handle that upstream work.
What file formats work?
JPEG, PNG, and TIFF up to reasonable consumer scan sizes. HEIC uploads from iPhones are converted automatically.
Can I colorize video?
No — Colourise focuses on photographs. Video colorization has a different set of constraints (temporal coherence across frames, motion-aware color propagation) and isn't something we currently offer.
Does it replace a professional restoration artist?
For most family and personal archives, the AI result is indistinguishable from manual work and takes seconds instead of hours. For museum-grade archival work, a trained artist using Colourise as a starting point is still the gold standard — the AI gives them a first draft to refine instead of a blank canvas.